Inquisitor Labs
Working With AI

Working With AI

We’ve developed a range of browser extensions designed to help you get more out of any browser‑based AI system - from major freely available lab models to your own custom local builds.

Each tool focuses on practical workflow improvements: clearer prompts, faster iteration, better UI control, and more predictable behaviour. These extensions are listed below.
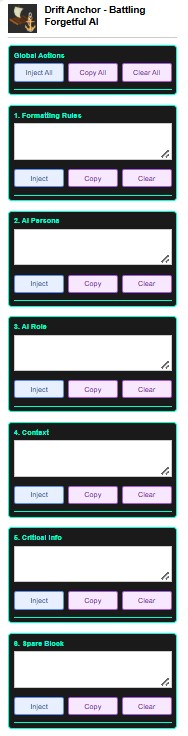
Drift Anchor Screenshot

Drift Anchor (Web Broswer Extension)

Drift Anchor is a simple way to keep your rules steady during long AI sessions. The AI drifts, forgets things, or starts rewriting your instructions. Drift Anchor gives you a set of persistent text blocks you can re‑inject whenever the AI wanders off. Each block stores its own text, survives browser and system restarts, and works on any browser‑based AI system. It’s available for both Chrome and Edge.

AI systems drift. This keeps your rules steady.

Using Drift Anchor Effectively

Drift Anchor provides six independent text boxes. Each box stores its own content and persists across Chrome restarts and Windows restarts. You can prepare structured prompts in advance and inject only the parts you need, exactly when you need them.

Injection attempts to place the text directly into the site’s AI prompt field. Some sites allow this, many do not. When injection doesn’t work, use the Copy button and then manually paste the text yourself.

Typical uses

  1. Formatting Rules
    Use this block to define how you want the AI to structure its output.
    Examples:
    • “Use short paragraphs and clear section headers.”
    • “No metaphors, no filler, no conversational tone.”
    • “Lists must be single‑level, no nested bullets.”
    This keeps the model from drifting into rambling or decorative writing.
  2. AI Persona
    Set the tone and interaction style.
    Examples:
    • “Direct, literal, technical. No hype.”
    • “Dry, concise, adult tone. No emojis.”
    • “Explain reasoning only when asked.”
    Re‑inject this whenever the model slips into cheerleading or over‑explanation.
  3. AI Role
    Define the functional role the model should adopt.
    Examples:
    • “Act as a developer reviewing code.”
    • “Act as a technical editor improving clarity.”
    • “Act as a requirements analyst.”
    Roles drift easily, so this block helps pull the model back to the correct mode.
  4. Context
    Store the project outline or the specific thing you’re working on.
    Examples:
    • “This is for a job application cover letter.”
    • “We’re drafting a message to a landlord about a repair.”
    • “This is the outline for a short story set in winter.”
    • “We’re working on a plan for reorganising the garage.”
    • “This is the description of the product I’m selling online.”
    Re‑inject when the AI starts forgetting what the session is about.
  5. Critical Info
    Facts the AI must not distort.
    Examples:
    • Names of people involved (“Emma is the tenant, Mark is the landlord”).
    • Constraints (“must fit in a 2‑metre space”, “budget is £150”).
    • Important details (“the appointment is on Thursday”, “the parcel is already paid for”).
    • Specific wording that must stay unchanged (“use this exact sentence in the email”).
    This block prevents the AI from mutating or rewriting details that need to stay exact.
  6. Spare Block
    A general‑purpose slot for anything temporary or session‑specific.
    Examples:
    • A short checklist
    • A temporary constraint
    • A snippet you need to reuse across turns
    It’s simply an extra box for whatever doesn’t fit cleanly into the other categories.

Workflow notes

  • Re‑inject your rules whenever the model starts drifting.
  • Keep persona, role and formatting separate — it reduces distortion.
  • Use Critical Info to anchor facts the model tends to mutate.
  • Use the Spare Block for temporary constraints or session‑specific instructions.
  • When injection doesn’t work, use the Copy button and then manually paste.
  • Treat Drift Anchor as your reset point during long conversations.

Download: Get Drift Anchor from the Microsoft Edge Add‑ons Store
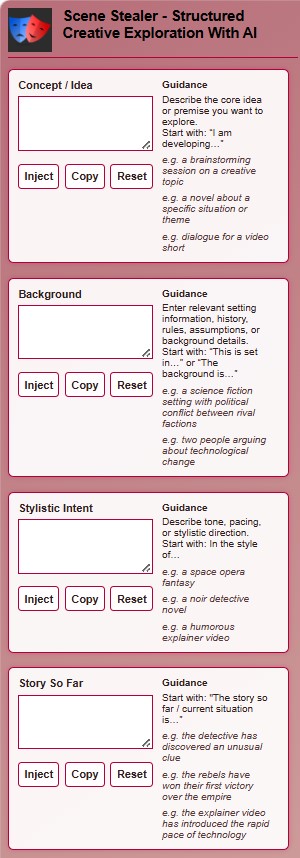
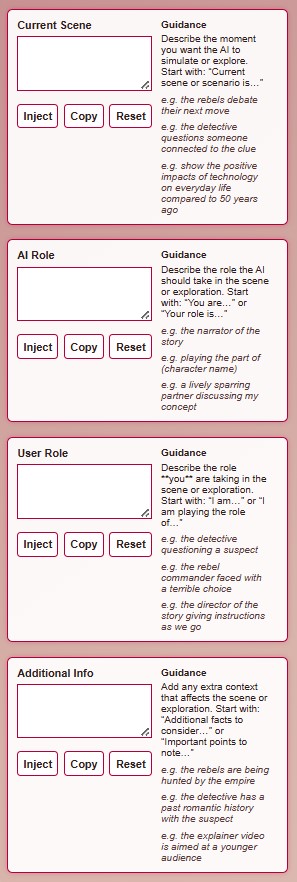
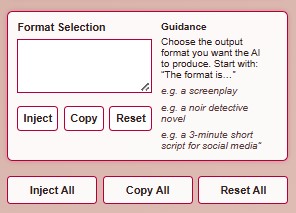
Scene Stealer Screenshot Top Scene Stealer Screenshot Middle Scene Stealer Screenshot Bottom

Scene Stealer (Web Broswer Extension)

Scene Stealer helps you set up creative scenes, situations, or moments for you to explore and develop with AI. Each block stores its own text and lets you inject or copy it into the AI prompt field. All fields are optional. Provide only the information relevant to the output you want the AI to generate. You can define the idea, background, style, current moment, roles, and any extra details you want the AI to follow. It’s available for both Chrome and Edge.

Build the scene. Let the AI explore it.

Using Scene Stealer Effectively

  1. Concept / Idea
    Describe the core idea or premise you want to explore.
    Examples:
    • “I am developing a brainstorming session on a creative topic.”
    • “I am developing a novel about a specific situation or theme.”
    • “I am developing dialogue for a video short.”
    • “I am developing a simple scene about two people disagreeing.”
    Start with: “I am developing…”
  2. Background
    Enter relevant setting information, history, rules, assumptions, or background details.
    Examples:
    • “This is set in a science fiction world with political conflict between rival factions.”
    • “This is set around two people arguing about technological change.”
    • “This is set in a small town dealing with a local issue.”
    Start with: “This is set in…” or “The background is…”
  3. Stylistic Intent
    Describe tone, pacing, or stylistic direction.
    Examples:
    • “In the style of a space opera fantasy.”
    • “In the style of a noir detective novel.”
    • “In the style of a humorous explainer video.”
    • “In the style of a grounded drama.”
    Start with: “In the style of…”
  4. Story So Far
    Start with: “The story so far / current situation is…”
    Examples:
    • “The detective has discovered an unusual clue.”
    • “The rebels have won their first victory over the empire.”
    • “The explainer video has introduced the rapid pace of technology.”
    • “The main character has just arrived somewhere important.”
  5. Current Scene
    Describe the moment you want the AI to simulate or explore.
    Examples:
    • “The rebels debate their next move.”
    • “The detective questions someone connected to the clue.”
    • “Show the positive impacts of technology on everyday life compared to 50 years ago.”
    • “Two people try to resolve a disagreement.”
    Start with: “Current scene or scenario is…”
  6. AI Role
    Describe the role the AI should take in the scene or exploration.
    Examples:
    • “You are the narrator of the story.”
    • “You are playing the part of a character.”
    • “Your role is a lively sparring partner discussing my concept.”
    • “You are the voiceover explaining the situation.”
    Start with: “You are…” or “Your role is…”
  7. User Role
    Describe the role you are taking in the scene or exploration.
    Examples:
    • “I am the detective questioning a suspect.”
    • “I am the rebel commander faced with a difficult choice.”
    • “I am the director of the story giving instructions as we go.”
    • “I am the person trying to solve the problem.”
    Start with: “I am…” or “I am playing the role of…”
  8. Additional Info
    Add any extra context that affects the scene or exploration.
    Examples:
    • “The rebels are being hunted by the empire.”
    • “The detective has a past romantic history with the suspect.”
    • “The explainer video is aimed at a younger audience.”
    • “The characters are under time pressure.”
    Start with: “Additional facts to consider…” or “Important points to note…”
  9. Format Selection
    Choose the output format you want the AI to produce.
    Examples:
    • “The format is a screenplay.”
    • “The format is a noir detective novel.”
    • “The format is a 3‑minute short script for social media.”
    • “The format is a simple dialogue scene.”
    Start with: “The format is…”

Download: Coming soon

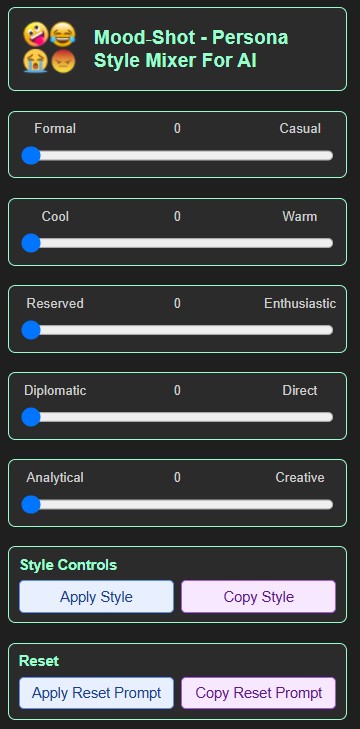
Mood Shot Screenshot

Mood Shot: Persona Style Mixer for AI
(Web Browser Extension)

Mood Shot is a persona style mixer for AI. It lets you shape how the AI behaves by adjusting sliders for tone, warmth, enthusiasm, directness, creativity, and more. As you move the sliders, Mood Shot builds a combined persona prompt in real time. You can inject that prompt into the AI text box when the site allows it, or use the Copy button and paste it yourself. Mood Shot works with any web based AI chatbot on Chrome or Edge.

Pick the mood. The AI follows it.

Using Mood Shot Effectively

Mood Shot gives you fine grained control over the AI's behaviour. Each slider adjusts a specific dimension:

  • Formal to Casual controls how structured or relaxed the AI's tone is.
  • Cool to Warm adjusts how emotionally neutral or friendly the AI feels.
  • Reserved to Enthusiastic sets how energetic or understated the delivery should be.
  • Diplomatic to Direct determines whether the AI should be tactful or straightforward.
  • Analytical to Creative shifts the AI toward logic or imagination.

As you change the sliders, Mood Shot assembles a persona prompt that reflects your chosen mix. There are 3125 possible combinations, giving you a wide range of styles to experiment with.

Style Controls

  • Apply Style inserts the assembled persona prompt into the AI's input field when supported.
  • Copy Style copies the persona prompt to your clipboard.
  • Apply Reset Prompt sends a neutral baseline prompt to the AI.
  • Copy Reset Prompt copies the neutral baseline prompt to your clipboard.

Instructions

Mood Shot works with any freely available web based AI. System restrictions permitting, it is a simple way to adjust the AI's persona without writing long behavioural prompts yourself. Pick your settings, generate the style, and inject or paste it into the AI.

Behaviour Notice

Mood Shot may produce exaggerated or unpredictable AI behaviour, especially with extreme slider combinations. Treat all outputs with caution.

Compatibility

Apply Style may not work with all web based AIs. Copy Style is always reliable.

Download: Coming soon
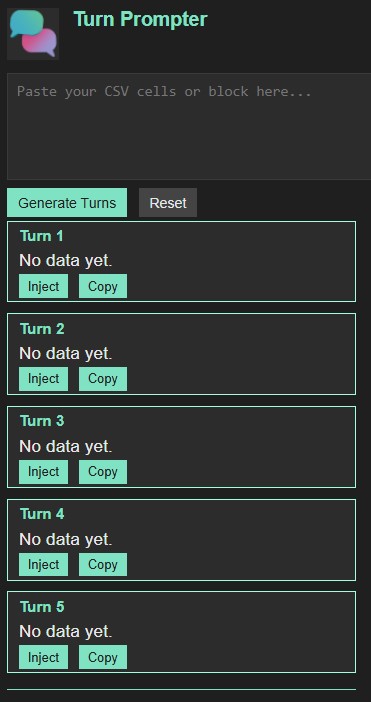
Turn Prompter Screenshot

Turn Prompter (Web Browser Extension)

Turn Prompter is a lightweight interface built for a heavy purpose. It gives developers and QA testers a fast way to run short, controlled test conversations without workflow friction. It accepts a column of five CSV cells or any input containing exactly five lines, where each line ends with a Return or Enter line break. Each line is placed into Turn 1 through Turn 5 in order, ready to inject or copy into any web based AI.

Turn Prompter keeps the UI minimal so the testing process stays focused. The concept behind it is not lightweight. It is designed for structured, repeatable, multi turn evaluation, where consistency matters and manual copy paste slows everything down.

How Turn Prompter Works

  • Prepare five user side turns in a single CSV column or as five separate lines.
  • Ensure each line ends with a Return or Enter line break so Turn Prompter can detect the boundaries.
  • Paste the five lines into the input box.
  • Select Generate Turns to map each line to Turn 1 through Turn 5.
  • Inject places the text directly into the AI input field when supported.
  • Copy lets you paste the text manually when injection is not available.

Turn Prompter does not rewrite or modify your text. It simply assigns each line to its own turn for controlled testing.

Usage Notes

Turn Prompter works with any model. Injection is fully reliable on local models. Some hosted AIs may accept injected blocks intermittently depending on their own safety rules. Copy is a reliable fallback when injection is unsupported.

Turn Prompter is intended for short, five turn test runs. It is ideal for prompt engineers, extension developers, QA testers, and anyone who needs to repeatedly test the same structured inputs without friction.

Download: coming soon

Support

Support is available only for reproducible issues related to the extensions listed on this page.

william.argo@proton.me